
Not my normal build, but variety is the spice of life, right?
I've never built a kit by MENG before but I'm extremely impressed with the presentation, instructions, and the plastic components that I already know will build into a stunning model of the M3A3.
I've never built a kit by MENG before but I'm extremely impressed with the presentation, instructions, and the plastic components that I already know will build into a stunning model of the M3A3.
So, let's see...............I started with the laborious task of putting together road wheels................
............... but then jumped ahead to work on the suspension which has been designed to work - an excellent detail. This part of the build went relatively smoothly although my rough handling snapped a trailing arm which needed a super-glue repair.
The instructions ask us to cut off some vision blocks to the rear of the upper hull, and this was a scary prospect, not to mention a dangerous one that could have cost me a finger! Bolt-on armour covers the areas where the vision blocks were massacred........I mean, removed with precision, so don't worry about the gaping rectangular holes removing these blocks will cause (if you have the interior, you will need to remove the interior part of these vision blocks, too).
Every hatch/door opens on this kit, so under the bonnet/hood you'll see the engine (that's if you purchased an engine to go inside), the driver's hatch opens, as does one on the rear deck. You'll also find that the rear ramp lowers and the door inside of it opens, however, to take full advantage of these excellent features you'll need to have purchased the interior set. If you buy your kit directly from the Far East, along with interior components, it will not be expensive and you'll be glad you did so. I didn't do any of the above because I don't like painting interiors, although the kit is so nice I sort of wish I had now.

There is is photo-etch supplied with the kit, and quite a bit of it. So far it's been enjoyable with no microscopic components to bend into complicated shapes, but instead nice thin pieces to represent engine grilles and so forth.

Anyway, the only thing I can say about this kit is, buy it! (and this is coming from someone who doesn't normally like modern subjects).


 |
| Road wheels assembled and ready to roll..............(sorry, couldn't resist!) |
The instructions ask us to cut off some vision blocks to the rear of the upper hull, and this was a scary prospect, not to mention a dangerous one that could have cost me a finger! Bolt-on armour covers the areas where the vision blocks were massacred........I mean, removed with precision, so don't worry about the gaping rectangular holes removing these blocks will cause (if you have the interior, you will need to remove the interior part of these vision blocks, too).
Every hatch/door opens on this kit, so under the bonnet/hood you'll see the engine (that's if you purchased an engine to go inside), the driver's hatch opens, as does one on the rear deck. You'll also find that the rear ramp lowers and the door inside of it opens, however, to take full advantage of these excellent features you'll need to have purchased the interior set. If you buy your kit directly from the Far East, along with interior components, it will not be expensive and you'll be glad you did so. I didn't do any of the above because I don't like painting interiors, although the kit is so nice I sort of wish I had now.

There is is photo-etch supplied with the kit, and quite a bit of it. So far it's been enjoyable with no microscopic components to bend into complicated shapes, but instead nice thin pieces to represent engine grilles and so forth.

Anyway, the only thing I can say about this kit is, buy it! (and this is coming from someone who doesn't normally like modern subjects).
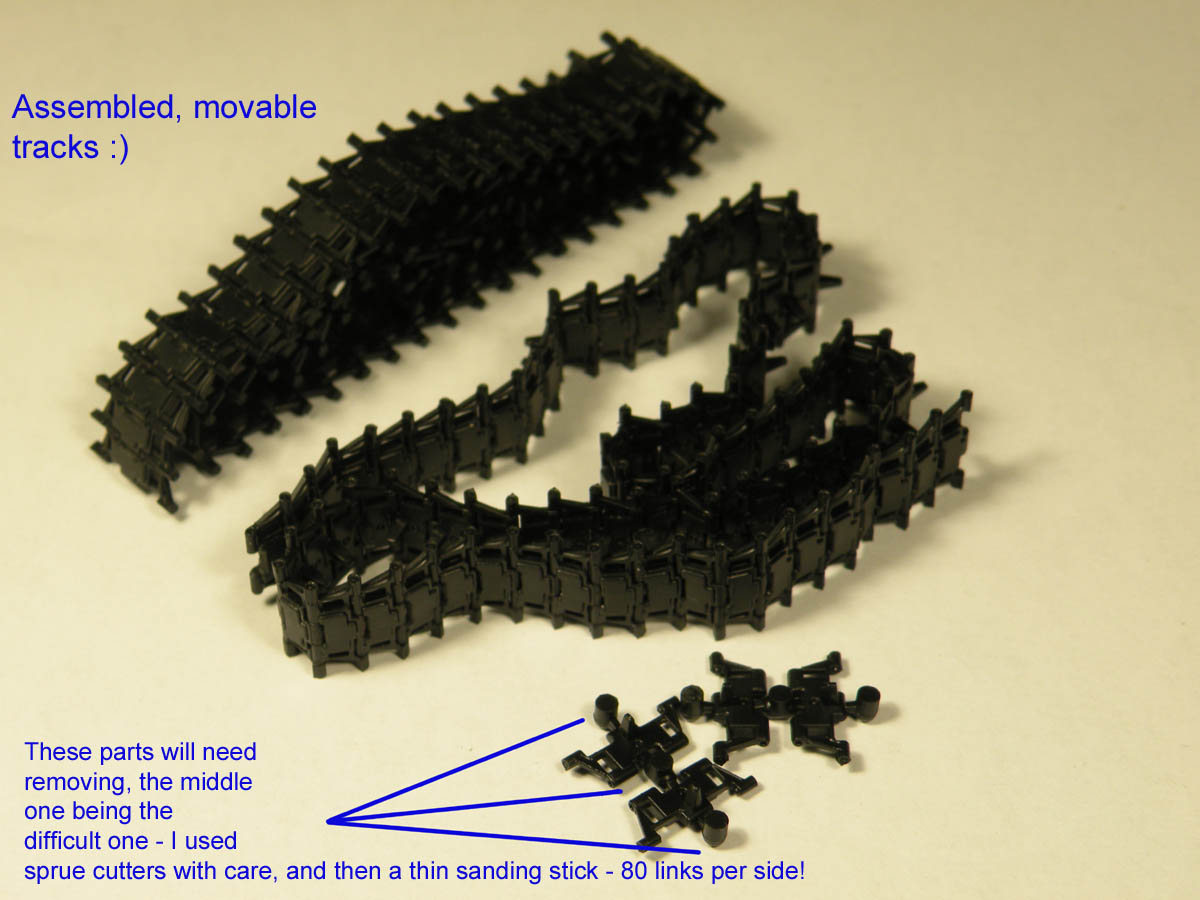
The tracks with this kit are workable and click together with no glue required, so no problems, just the boring task of carefully cutting away the three pieces of sprue as per photo above. Take care with the middle one as it's difficult to get sprue cutters in there; I cut off as much as possible with my cutters and then used a very thin sanding stick which did the job perfectly. And, 160 links later I had two workable track lengths (thank don't fall apart when handled, unlike others I've made in the past), and curiously, quite a few spare links, which is always nice.....................(I think).

After carefully studying a photo of the real vehicle, I took my trusty craft knife and began to gently score the vertical lines of one of the lower armour panels; I'd previously measured the top of this same panel to leave myself a mounting bracket by scoring horizontally. With the remaining 1/3 of this panel I cut off each corner, as per real vehicle, and sanded it down to make it appear recessed; I then drilled three holes to represent the missing bolts. On the other busk/'skirt' section I removed two armoured panels leaving no brackets. Various bolt heads were sanded down on both left and right sections of the armoured panels and holes drilled to represent missing bolts.
More soon......................
No comments:
Post a Comment