Above: Well, she's finished and very glad I am too! Not that I didn't enjoy this build, but after three resprays it was all getting a little but repetitive. My first attempts at a camo job were overly ambitious in my chosen camo pattern, so in the end I opted for something a little easier, although definitely authentic.
Above: my truck depicts a machine that was perhaps captured in North Africa and found its way to Italy, or maybe it was captured in Italy...............either way, it ended up in German hands. My only reason for choosing this option was that I wanted something a little different, and as German-captured trucks had already been created by other modellers, I opted for an unsual camo pattern taken from WWII photos of German trucks.
Above: the worst part of this old kit is the 'glass' and that can easily be fixed; I only replaced the top pieces as they looked really awful from the outside, even if fitted as instructed. As replacements, I used clear plastic from commercial packaging, such as found when you purchase print cartridges - you know, the clear plastic? I like to recycle when I can! Cut to shape, with a little excess around the edges, and this new 'glass' can easily be stuck using white glue which is also very easy to clean up and quite strong once dried properly.
Above: an amble supply of Jerry cans (from the Great Wall Hobby set) and a Tamiya oil drum completed the load. The German Balkenkreuz came from the spares box.
Above: I used many oil weathering techniques on this build including a filter, fading, a pin wash, streaking grime and rust streaks, pigments, pastels. It was only after the filter that I started to like my build - the filter tied all the camo and base-coat of self-mixed dunkelgelb together.

Above: I quite liked the plastic 'canvas' that came with the kit once painted, but decided to experiment with a tissue and some watered-down white wood glue. I cut the tissue to shape, and placed it on the roof. I then took an old brush and lightly stippled my glue mix onto the canvas which to my delight instantly started to wrinkle and look just like material! I spent the next five minutes gently dabbing the tissue and 'moulding' it across the frame beneath, using a cocktail stick to gently re-arrange the wrinkles when needed. I also thought a tear would be suitable for such a well-worn machine used by two different armies; I must admit, that my torn tissue 'canvas' is something I'm quite proud of............
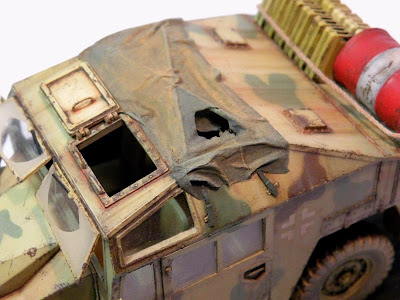
Above: the kit's solid plastic grab handles on the top hatch were sanded off and replaced with brass wire; I also added a brass grab handle to the inner hatch door which had nothing in standard kit form. The metal loops to tie the straps securing my canvas roof were cut from an aluminum and the straps themselves made from Tamiya tape cut to shape.
Above: most German soft-skins and some armoured vehicles had white visibility markings on the bumpers and these I hand-painted. Chipping on these areas and other parts of the truck was done with a tiny piece of sponge held in tweezers. The chain is a cheap jewelry piece from a craft shop, the bucket is from Tamiya, the number plate holder is scratch-built from aluminum and plastic card; decals are for a 'German truck in Italy' which I took from an old Italeri kit. The front windshields are from the kit windows to which I painted window frames.

Above: again, the number plate holder was scratch-built. The dust effects were added with Tamiya Buff, which you have to be careful with, especially on a machine this colour as it can obscure a lot of your previous hard work and without the dust effect being achieved. I avoided near-disaster by adding copious amounts of Klear on my build BEFORE dusting began. My first attempt was not favourable so luckily a damp cocktail stick soaked in thinner saved the day - I do NOT advise you to try this as it was very risky. Lady luck was with me that day as I was able to clean off the dust. I re-dusted again, even more carefully, sweating as I went while utilising a fake post-it note to mask areas I wanted left clean. NOTE TO SELF - in future builds I will mainly save my 'buff dust' for darker-coloured vehicles.

Finally, the wheels were weathered using Mig Pigments for the tyres while the underside and wheel arches were given a mud mixture made from white glue, water and pigments (, dry & fresh mud, and of course my favourite, European dust).


